Position Axis
You can control the standard, box-whisker plot X Axis, and stiff plot X Axis position when editing an axis, creating a new axis, or adding a plot to an existing axis. Click the Set button next to the Position option on the Axis page to open the Position Axis dialog and set positioning options. The selected axis properties are displayed in the Property Manager. If you move an axis, the plot is moved relative to the axis movement.
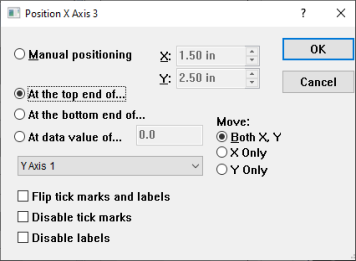
Control the axis position in the Position
Axis dialog.
Manual Positioning
Use Manual positioning to set a specific axis location on the page. The axis is positioned using the axis X and Y location in inches or centimeters. The measurements are from the lower left corner of the page. The starting point is the left edge of the X axis and the bottom edge of a Y axis.
Automatic Positioning
There are three automatic positioning options that locate the new axis relative to another axis.
- If an X Axis is selected or added, the default position options are to place the X Axis At the top end of or At the bottom end of a Y Axis. If you would like to place the X Axis to the left of or right of another X Axis, select the X Axis from axis list. If an X Axis is selected from the axis list, the options change to At the right end of and At the left end of.
- If a Y Axis is edited or added, the default position options are to place the Y Axis At the right end of or At the left end of an X Axis. If you would like to place a Y Axis at the top of or bottom of another Y Axis, select the Y Axis from the axis list. If the Y Axis is selected from the list, the options change to At the top end of and At the bottom end of.
- If a Z Axis is selected or added, the default position options are to place the Z Axis At the top end of or At the bottom end of a Y Axis or At the right end of or At the left end of an X Axis. If you would like to place the Z Axis relative to a Y Axis, select the Y Axis from the axis list. If the Y Axis is selected from the list, the option to change to At the top end of and At the bottom end of.
- To place the axis at a specific data location, click the At data value of option and enter the data value into the box.
Moving Axes
Axes can be positioned by moving the axis vertically, horizontally, or both.
- Select Both X, Y to move an axis in both directions.
- Select X Only to only move the axis horizontally. The axis keeps its current vertical position and only moves horizontally.
- Select Y Only to only move the axis vertically. The axis keeps its current horizontal position and only moves vertically.
Flip Tick Marks and Labels
Check the box next to the Flip tick marks and labels option to place the tick marks and labels on the opposite side of the existing tick marks and labels.
Disable Tick Marks
Check the Disable tick marks box to turn off tick marks display on the axis. The display can be turned on again by checking the Show ticks on options on the Tick Marks tab.
Disable Labels
Check the Disable labels box to turn off the label display from the axis. The display can be turned on again by checking the Show labels option on the Tick Labels tab.